Welcome to my blog,

Welcome,

To contact me by email
or visit my Stampin' Up Website


Thursday, February 2, 2012

Paper Roses

No, not the song...although now the song is probably stuck in your head...sorry ;0)

I received a link to make Paper Roses using the Tasteful Trim Bigz XL Die  (page 221)  with the Big Shot machine. The tutorial is available for FREE from Lynn Pratt's blog.

 A little secret here, if you cut only one wavy trim, place it on a soft surface (I used a towel folded several times) using the rounded end of your bone folder rub the paper over and over (with enough pressure) it will break down the fibres and if you gently start at one end you can separate the paper in two.

Why do all that?
Once separated the inside of both pieces of paper have a velvety finish, just like a rose petal and the paper is softer to work with and manipulate. (notice the red rose in the second picture, I even curled the edge) Once separated I sponged along both velvety edges of both trims to give the flower different shades of colour. When brading the trims make sure the soft side is facing you (that will put the velvety side on the outside).

If you rip the trim while trying to separate it, don't despair, you can use the smaller trim to make a rose bud (see the yellow one above).

Give them a try and let me know how you enjoyed making them. My goal is to make myself a full dozen.

Thanks for stopping by,

Louise

Valentine's Day Cards

Valentine's Day, a time to make that special guy in your life a card to express how much you love him.

Here are a few samples of the ones I've been working on:

This card is a gate fold made
using Sahara Sand DSP
pattern paper, Chocolate
Chip cardstock, Sahara Sand cardstock, Outlined
Occasions stamp set from the Sale-a-bration* catalogue, the inside stamps is retired "Furnished with love", but I couldn't resist the little pun "You light up my life" with the image of a lamp.


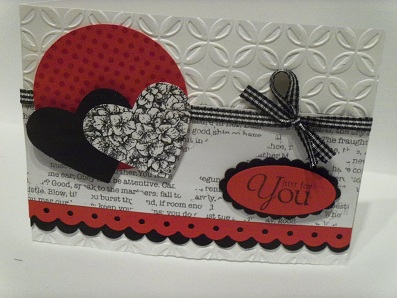
There's something about red/white/black combination that just screams, Love. Don't you agree? I always enjoy creating different textures and apperances on my cards. On this one, I stamped the white heart with Classic Black using the Hydrangea from the "Because I care" stamp set, had fun scoring the black heart every 1/8" to give it a striped effect, embossed the red circle with clear embossing powder, superimposed two different border punches. Top all this on the Night and Day DSP (retired) and finish it off with the black and white gingham ribbon and you get my "Just for You" card.

This card was started with the new DSP Everyday Enchantment and the "Elementary Elegance" stamp set which I got for free from the Sale-a-bration* catalogue (my favorite catalogue). The crown, bird and butterfly stamped with soft suede on the very vanilla cardstock are all found in the design of the paper and the larger stamp used in the middle of the card making the designing of this card simple, as everything works together. The "Just for you" and the sentiment for the inside of the card are both from the "Precious Butterflies" stamp set. This card with the Crystal Effect added to the crown in the middle would be perfect for that "Princess, Prince, Queen or King" in your life.

*Don't forget during Sale-a-bration, for every $60.00 order you place you could get to choose from a variety of products in our Sale-a-bration catalogue.

Thanks for stopping by,

Louise

Wednesday, February 1, 2012

Punch Art Lotus Easel Card

Every month our team decides on a card style that we will swap. This month was my turn to choose. I suggested we make cards using punch art flowers. Now usually my cards are done during the last few days of the month (I work best under pressure), but I was so excited to try a technique I saw on Valita's Design and Fresh Folds blog that although it's only Feb 1st, my cards are all done.

Thanks to my team lead's generous loan of some punches here is the result (Thank you Carol).


I used the stamp set Precious Butterflies, the sentiment inside the card has already become one of my favorites:

Friendship is precious,
not only in the shade,
but in the sunshine of life.
--Thomas Jefferson

Although Valita's lotus flowers were made with the small leaf from the Blossom Petals Builder punch, I substituted it with the 5-Petal Flower punch (it saved on paper and I could punch once and get 5 petals by simply cutting to the centre between each petal). I couldn't resist using the Wisteria Wonder cardstock and ink to give this card the softess I was looking for, then added Dazzling Details to the tips of the long flowers and Vanilla Shimmer Smooch Spritz on the open blossom to give them just a touch of glimmer.

Thanks for stopping by,

Louise

Monday, January 30, 2012

Finally Back

Hi everyone,

I wish to apologize for the long period I was away. First hubby and I took a wonderful vacation, but the day after our return he had a medical condition that we've had to deal with for the past 2 months. A big THANK YOU, to all who sent their prayers and wishes our way, it really helped us through it all. Our combined prayers were answered and his vision is close to being back to where it was before this all started. It is amazing how we've advanced in eye surgeries.

I've posted a few classes on my Stampin' Up! website. A few for Valentine's day (can't post the examples as I'm still debating which ones to use) and one called "Card Kit Surprise" here's an example of cards similar to what we will be making.


This set includes a Friend to Friend card with a lovely sentiment inside, a Sympathy card and a Birthday card. I used 3 identical card bases, 1 piece of Designer Series Paper (retired) some scraps of other cardstock and different embellishments to change the look of each card. If you're interested in seeing how simple changes can create cards with such different purposes, join us on February 18th, 2012.

Saturday, December 3, 2011

Big Shot / $100.00 in Stampin' Up! Products Winner

Congratulations to

Jean Macritchie

Thank you to all our customers who participated.