Welcome to my blog,

Welcome,

To contact me by email
or visit my Stampin' Up Website


Friday, April 13, 2012

Sweet Pea Mother`s Day Card


This card was originally made by Judy Marshall and shared by our Team Lead Carol . When I saw it I immediately thought it was the perfect card for Mother`s Day.

I will be holding a class to make this pretty card on April 30th, 2012 from 7 p.m. to 9 p.m.

For this class and all future classes, I would ask you to bring the following:
Glue Dots
Dimensionals
Double sided tape
Snail adhesive
Glue Pen
Bone Folder
Scissors
Paper Trimmer
(If you don't have some of the supplies I do have them available for an additional cost)
If interested please contact me by calling 902-758-1479 or
email me.

Thursday, April 12, 2012

Stampin' Up! Lovely as a Tree

I can't believe it 4 posts in one day, this will be the last one for today.

Another of my long time on the wish list items. The Lovely as a Tree stamp set can be used for Christmas, Father's Day, Male birthday even Sympathy cards. Here are some examples.


June 2nd I will be offering a class to make Father's Day cards using the Lovely as a Tree stamp sets.

Please join us by calling me at 902-758-1479 or email me.

Iris Folding with Stampin' Up

Over the past few months I've had the opportunity to join a group of ladies at one of our local churchs for scrapbooking Wednesday evenings. One of the ladies brought in some Iris Folding templates to share with a few of us. Once I realized how easy this new craft is, I was hooked, I came home and looked up free templates online. Using some papers from a Stampin' Up! patterned paper packs here is what I created.


The spiral portion in the middle is the actual Iris folding. Other techniques I used on this card are:
-The flowers were punched with the Stampin' Up! 5 Petal Flower punch and the Boho Blossoms punch out of "Coffee Filters" inked with Stampin' Up! ink refills/water mix. Then I adorned them with Basic Pearls.
-I frayed a piece of grosgrain ribbon to make a pretty tassle for the edge of the card and added a button to tie it with.
-Gel Pen sticking was added to finish the card.

 I will be offering a class on Iris Folding 
 Monday April 23rd, 2012
7 p.m.- 9 p.m.
Cost $10.00

If interested please contact me by calling 902-758-1479 or email me.

Thanks for stopping by.

Elements of Styles

The Elements of Styles stamp set has been on my wish list for a full year. Last month I finally received it. This stamp set is very versatile as it can be used for any feminine card you would want to make, a simple change of greeting and Voila!


This one was done using the Wisteria cardstock, ink and baker's twine on Whisper White cardstock.
These two used all the 2011-2012 in-colours  Pool Party, Calypso Coral, Wisterial Wonder, Lucky Limeade and Island Ingigo, adding Clear Embossing powder made for a simple soft background.

The little Humming Bird is priceless and quite easy to cut out if you wanted to superimpose him with dimensionals.

Thanks for stopping by.

Retirement Card (Broken Porcelain Technique)

So many projects so little time. Since I haven't posted in a few months there will be many posts put in all at once. I do apologize but I am sufforing with the "I can't seem to get myself organized blues" also known as "Cabin Fever" I do believe.  Although we haven't had a bad winter it seems like it's been a long one. So here goes. Over the past few months I've held several private classes as well as hosted a few techniques classes. The next few posts will highlight some of my creations.

For that special someone who is retiring in this area, this would be wonderful image to set their minds on.


The image looks like a broken porcelain plate.
I will be giving a class on this technique on April 28th,  2012 at 9:00 am cost $10.00, we will learn the technique and built a take away tool to achieve the "Broken Porcelain" look, if you are interested please give me a call 902-758-1479 or email me.

For this class and all future classes, I would ask you to bring the following:
Glue Dots
Dimensionals
Double sided tape
Snail adhesive
Glue Pen
Bone Folder
Scissors
Paper Trimmer
(If you don't have some of the supplies I do have them available for an additional cost)

and most important if you have some, the rubber left over from any stamps you have purchased. Yes, that square piece of rubber with the cut out shapes where you removed the stamps. If you discarded yours that's ok I have lots.

Here's another example


Thank you for stopping by.

Thursday, February 16, 2012

Prep work for class

In preparing for a class I have this weekend, I've been playing with all the tidbits of paper I have. I've tried to not cut any new piece of DSP. I keep all my scraps in a binder and I started at the front of the binder and am working through from plastic sleeve to plastic sleeve. It's not until I thought that maybe I could post some of the pictures of the cards I made that I realized how many I actually got made this week. So here goes:

This set is made with one of my favourite stamps "Riot of Petals" unfortunately retired but still a favourite. I used the Bleach technique on Chocolate Chip cardstock. I first used versa mark on the stamp then embossed using with different colours of embossing powders. Although the result from the bleaching process produces almost the same colour everytime, using the different embossing powder colors seems to change the overall look.


For this one I used the Tangerine Tango embossing powder
and this one I used the black embossing powder
The set includes a Gift Box, 2 Sympathy, 1 Get Well, 1 Thank You and 2 blank cards. 

-----------------------------

These two sets were made with the "Beyond The Garden"
DSP, the idea was to show that by using different sizes of DSP with some different card stock one can achieve a variety of cards.

 ------------------------------------------
 These 4 cards were created just for Him.
---------------------------------------------

These two cards were made using different patterns of the same colour for a monochromatic look.
---------------------------------------------

Although I do like monochromatic, this should prove that I also really like colours...
Thank you for stopping by.

Thursday, February 2, 2012

Paper Roses

No, not the song...although now the song is probably stuck in your head...sorry ;0)

I received a link to make Paper Roses using the Tasteful Trim Bigz XL Die  (page 221)  with the Big Shot machine. The tutorial is available for FREE from Lynn Pratt's blog.

 A little secret here, if you cut only one wavy trim, place it on a soft surface (I used a towel folded several times) using the rounded end of your bone folder rub the paper over and over (with enough pressure) it will break down the fibres and if you gently start at one end you can separate the paper in two.

Why do all that?
Once separated the inside of both pieces of paper have a velvety finish, just like a rose petal and the paper is softer to work with and manipulate. (notice the red rose in the second picture, I even curled the edge) Once separated I sponged along both velvety edges of both trims to give the flower different shades of colour. When brading the trims make sure the soft side is facing you (that will put the velvety side on the outside).

If you rip the trim while trying to separate it, don't despair, you can use the smaller trim to make a rose bud (see the yellow one above).

Give them a try and let me know how you enjoyed making them. My goal is to make myself a full dozen.

Thanks for stopping by,

Louise

Valentine's Day Cards

Valentine's Day, a time to make that special guy in your life a card to express how much you love him.

Here are a few samples of the ones I've been working on:

This card is a gate fold made
using Sahara Sand DSP
pattern paper, Chocolate
Chip cardstock, Sahara Sand cardstock, Outlined
Occasions stamp set from the Sale-a-bration* catalogue, the inside stamps is retired "Furnished with love", but I couldn't resist the little pun "You light up my life" with the image of a lamp.


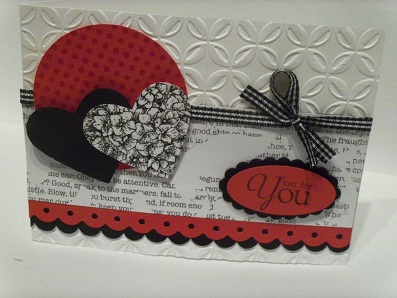
There's something about red/white/black combination that just screams, Love. Don't you agree? I always enjoy creating different textures and apperances on my cards. On this one, I stamped the white heart with Classic Black using the Hydrangea from the "Because I care" stamp set, had fun scoring the black heart every 1/8" to give it a striped effect, embossed the red circle with clear embossing powder, superimposed two different border punches. Top all this on the Night and Day DSP (retired) and finish it off with the black and white gingham ribbon and you get my "Just for You" card.

This card was started with the new DSP Everyday Enchantment and the "Elementary Elegance" stamp set which I got for free from the Sale-a-bration* catalogue (my favorite catalogue). The crown, bird and butterfly stamped with soft suede on the very vanilla cardstock are all found in the design of the paper and the larger stamp used in the middle of the card making the designing of this card simple, as everything works together. The "Just for you" and the sentiment for the inside of the card are both from the "Precious Butterflies" stamp set. This card with the Crystal Effect added to the crown in the middle would be perfect for that "Princess, Prince, Queen or King" in your life.

*Don't forget during Sale-a-bration, for every $60.00 order you place you could get to choose from a variety of products in our Sale-a-bration catalogue.

Thanks for stopping by,

Louise

Wednesday, February 1, 2012

Punch Art Lotus Easel Card

Every month our team decides on a card style that we will swap. This month was my turn to choose. I suggested we make cards using punch art flowers. Now usually my cards are done during the last few days of the month (I work best under pressure), but I was so excited to try a technique I saw on Valita's Design and Fresh Folds blog that although it's only Feb 1st, my cards are all done.

Thanks to my team lead's generous loan of some punches here is the result (Thank you Carol).


I used the stamp set Precious Butterflies, the sentiment inside the card has already become one of my favorites:

Friendship is precious,
not only in the shade,
but in the sunshine of life.
--Thomas Jefferson

Although Valita's lotus flowers were made with the small leaf from the Blossom Petals Builder punch, I substituted it with the 5-Petal Flower punch (it saved on paper and I could punch once and get 5 petals by simply cutting to the centre between each petal). I couldn't resist using the Wisteria Wonder cardstock and ink to give this card the softess I was looking for, then added Dazzling Details to the tips of the long flowers and Vanilla Shimmer Smooch Spritz on the open blossom to give them just a touch of glimmer.

Thanks for stopping by,

Louise

Monday, January 30, 2012

Finally Back

Hi everyone,

I wish to apologize for the long period I was away. First hubby and I took a wonderful vacation, but the day after our return he had a medical condition that we've had to deal with for the past 2 months. A big THANK YOU, to all who sent their prayers and wishes our way, it really helped us through it all. Our combined prayers were answered and his vision is close to being back to where it was before this all started. It is amazing how we've advanced in eye surgeries.

I've posted a few classes on my Stampin' Up! website. A few for Valentine's day (can't post the examples as I'm still debating which ones to use) and one called "Card Kit Surprise" here's an example of cards similar to what we will be making.


This set includes a Friend to Friend card with a lovely sentiment inside, a Sympathy card and a Birthday card. I used 3 identical card bases, 1 piece of Designer Series Paper (retired) some scraps of other cardstock and different embellishments to change the look of each card. If you're interested in seeing how simple changes can create cards with such different purposes, join us on February 18th, 2012.

Saturday, December 3, 2011

Big Shot / $100.00 in Stampin' Up! Products Winner

Congratulations to

Jean Macritchie

Thank you to all our customers who participated.

Friday, November 18, 2011

Orders between November 15 - 30th, 2011

Please note that I will not be available from November 15th to November 30th, if you wish to place an order that qualifies for the Big Shot contest during this period please click on this link and indicate ``Scrappin`Barn Order`` in the subject line.

Check out the Stampin` Up! website on Monday November 21st for a special limited time offer.

Monday, November 7, 2011

Christmas Blues Cards Class

As promised, although late, here is the picture of the 4 projects for the Christmas Blues class.

Sunday, October 30, 2011

Craft Sales

These past few weeks I've concentrated on preparing and participating in 2 Craft Sales. I'm taking a few moments to post the names of the winners of the draws I held for everyone who took the time to stop and look at the goodies at my table.

For the Elmsdale Elementary School Craft Sale the winner is Jan H of Milford.
Jan won this Godlen Touch Christmas Card Boxes Set:


Congratulations Jan I hope you enjoy them.

For the second craft sale which was a wonderful experience at the Hilden Firehall. The organizer Nancy needs special mention here. I was impressed at how everything for this sale was well planned and organized. If you are going to visit one Craft Sale put this one on you calendar every year for the last weekend in October held Friday from 1 until 8 and Saturday from 9 until 3.

The winner of the Christmas Blues boxed card set at this sale was Michelle A of Upper Stewiacke.


I sure hope Michelle especially enjoys the little spinning penguin card.

Congratulations Michelle.

Tuesday, October 4, 2011

Rose Garden

This card set was inspired by and brought me back to my early teens. My favorite song was "I never promised you a rose garden" sung by Lynn Anderson, it was also the first 45 I ever purchased with my own money (ok so now I've dated myself) and yes, for those of you who know me well, I still have the record!!


My favorite item in the Holiday Mini this year has to be the Dazzling Details (page 45 and only $3.25), the sparkle and glitter it adds to any card is absolutely beautiful.

Monday, October 3, 2011

Christmas Cards

Shaker Card --Snowman & Friend
A few cards I've been working on:

Traditional


Ice Friends, the little Penguin Rolls as he goes from one iceburg to the other.


I like the effect of blue white and red

I just love this Little Girl from the Greeting Card Kits "Thanks Susan"


My absolute favourite, my upline made a similar card for our swap last month, I changed a few things to make it into a Christmas Card. I'm not quite sure if his expression says "Disappointed there is nothing in my stocking or Uh!oh! I got caught!"

Thanks for stopping by and don't forget our special contest for each $25.00 you spend from Oct 1 to Nov 30, 2011 you get  a ballot for a chance to win a free Big Shot Machine or $100.00 in Stampin' Up! merchandise.

Saturday, October 1, 2011

What else could there be?

Now as if all the October Stampin' Up! promotions weren't enough already, here's more:


To make it fun for our customers as well we will include you in our friendly rivalry,
for each $25.00 (excluding Taxes and Shipping and Handling) you spend, you’ll get a ballot entry for a chance to win a Free Big Shot or $100.00 in Stampin’ Up! products of your choice available in any of our current catalogue in December.

Names from all 3 demonstrators will be put into one pot. The draw will take place on December 1st, 2011 and prize delivered before Christmas.

Don't forget to check out the new Clearance Rack items, direct purchases from the websites will count as well.

Good luck to all and Happy Shopping!


October Special Promotions

October is a good month at Stampin' Up! 3 promotions for our customers...

No. 1

If you ever thought of joining Stampin' Up! as a demonstrator, now's the time.

Why  now?  you ask.

Because Stampin' Up! will give you a free Big Shot Machine or $125.00 in free Stampin' Up! products just for joining. Click here to find out more

No. 2

Buy 2 Simply Sent kits and get a free coordinating stamp set to create your cards. Click here to find out more.


No. 3

Cookies and Stampin' Up!

Sweet Pressed Cookie Stamp, the picture does not do them justice, the stamps are much larger than they appear. The snow flake stamp would be perfect for cookies being left for Santa. Click here to find out more.

And if all that wasn't enough. Stampin' Up! added all new items to the clearance rack. As always the items are available while supplies last. So don't wait and click here. Then click Shop Now... look to the left for Clearance Rack...Happy Shopping.

Monday, September 5, 2011

Christmas Card "Stamp a Stack"

How would you like to learn how to make 10 cards with one piece of Designer Series Paper, 7 pieces of cardstock, ribbon and a few embellishments? Well now’s your chance. I am offering classes to make 10 Christmas cards for $30.00.

Give me a call or email to reserve your seat, then bring along you favourite adhesive, scissors, paper cutter/score blade. If you don’t have these no problem for an addition $2.00 I will provide them for you.

Included in this class are all other materials including DSP, cardstock, dimensionals, ribbons, stamps, ink, embossing powders, Big shot and accessories and my new favourite “Dazzling Details” from the Holiday Mini on page 41.

The following is an example of the 1st class offered on September 10th.


Tuesday, August 30, 2011

Tickled Pink

Yesterday I was surprised by one of the ladies from our techniques class. She used the inlaid embossing techniques we learned last week and created this adorable card using the image from her new Baby Tees jumbo wheel. She had me fooled when I looked at the card. I presumed she had used her wheel at different angles. But no, she had cut our each of those little tees and even the little hangers and placed them on her cardstock before embossing. She did an absolutely beautiful job, don't you agree?

Thanks to her, we were able to have our 1st Christmas card making class last night. I've been nursing my right hand for the past week and not able to cut or prepare for the class. But K came to the rescue and volunteered to help get the class ready. I owe her a big thanks for all her help and these are the cards we made.